The higher-level APIs provided an abstraction over the low-level stuff and were supposed to be cross-platform and easy to use. Unfortunately, it didn’t turn out to be that easy to use.
The higher-level APIs provided an abstraction over the low-level stuff and were supposed to be cross-platform and easy to use. Unfortunately, it didn’t turn out to be that easy to use.

The sixth edition of my weekly newsletter is out – a collection of interesting things I learned (or realized) last week – in a quick-read package. Today I Learned (TIL) is a weekly newsletter where I share interesting insights I learned last week from podcasts, books, and self-realization. I aim to share 7 insights, one […]

Automated a11y testing tools like aXe will cover only up to 57% of all accessibility issues. To spot the remaining 43% issues, manual testing is required.

This edition covers cool productivity tips to boost performance, thoughts about Indian sports and women leaders, and coding tidbits related to jQuery and Java.
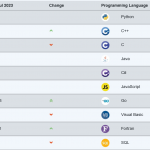
Lenny Primak made a pretty convincing argument in favor of Java – modern features, speed, and more concise syntax. It’s still one of the top programming languages as per various indices.

Today I Learned (TIL) is a weekly newsletter where I share interesting insights I learned last week from podcasts, books, and self-realization. I aim to share 7 insights, one from each day of the week, but that’s not always the case especially when I am traveling. The fourth edition went out yesterday where I talked […]
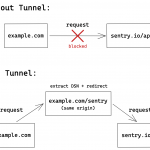
As such these third-party scripts are not ads, but a crooked company may piggyback on them to collect personal user data to serve ad companies. So it’s understandable why some ad-blockers may block these scripts.

Humans crave short-term rewards due to survival instincts. To boost motivation for long-term goals, visualize future success using your rich cognitive map built from practice.
When someone on the team is frequently asked to review PRs owing to their expertise or reviewing powers, they may experience pressure to be the gatekeepers. The pressure to know all the answers.

Stress helps you grow, but too much without rest leads to burnout. Breaks are essential yet tough to take in our busy lives. Mindfulness and organization aid in effective rest.